Friday, June 24, 2011

Remote Possibilities

"Wow! How did you get that shot? It looks like the horse is going to run over you!"
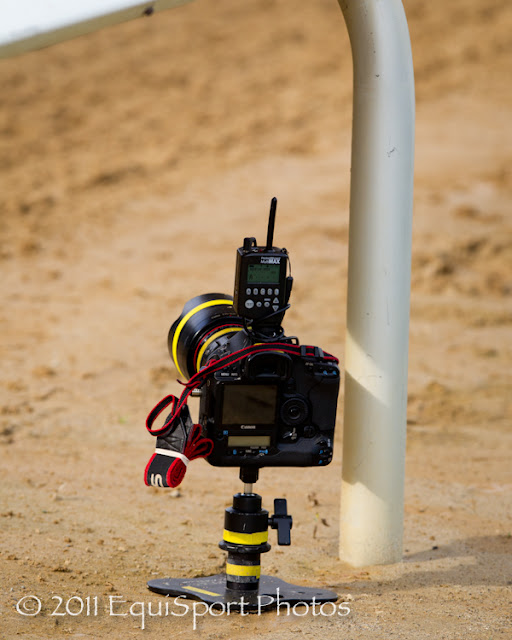
The short answer is "Just stick your camera in the dirt, and fire it with a remote".

Giant Oak (outside) wins the Clark H. at Churchill 10.26.2010. Manual priority, 1/1000 @ f/3.2, iso1250, 200mm
Wendy and I headed out to Stephen Foster Stakes Day at Churchill Downs last Saturday, for what promised to be a nice card and a nice day. After our schedule over the last few weeks, it sounded like fun in the sun.
And me just being me, I wanted to challenge myself to get something a little different... so I brought out the whole kit.

Dr. Ballenger wins at Churchill 6.18.2011. Photo: Matt Wooley, Shutter Priority, 1/1600 @ iso500, f/4.5, +2/3ev, 200mm.

My buddy Alex Evers, a contributor here on CTL Equine, got me started on "remotes" a few years ago. Seeing some of his unique perspectives got me hooked on the possibilities of placing cameras in some unusual spots. Like under the rail at the race track. Or in the starting gate. Or in the overhead trellis at a wedding!

Having the ability to use remotes gives you the chance to get the action from multiple cameras, and therefore multiple perspectives. The photo below frames an iconic backdrop at Churchill Downs.
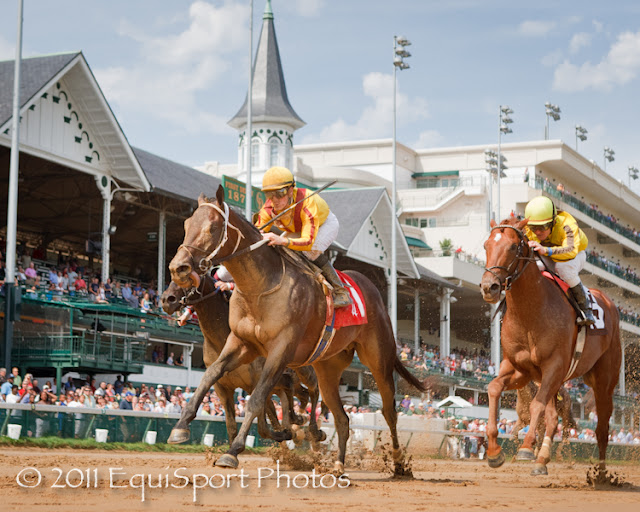
Dr. Ballenger wins at Churchill 6.18.2011. Photo: Matt Wooley, Shutter Priority, 1/3200 @ iso800, f/4.5, +2/3ev, 50mm

The possibilities are endless. If you can stuff a camera in a spot, you should be able to get a picture from that perspective.

Dr. Ballenger at Churchill 6.18.2011. Photo: Matt Wooley, Shutter Priority, 1/3200 @ iso800, f/4.5, +1/3ev, 15mm fisheye.
Remotes are also great for CYA, (cover your ass). Wendy and I both shot this race hand held as well, she with a 500 on the outside and me with a 300 inside, and went in tight on the #13 horse. Unfortunately for our photos, Dr. Ballenger ran him down at the wire from the outside.

Have I mentioned I'm a "Home run, or Ground Out" kind of shooter? I'm always swinging for the fence. In this case, we both got really nice tight shots... of the second place horse. Ground out. The remotes saved us!

So here's the set-up. Most of the time I will use a set of Pocket Wizards. These units can be set to send or receive a radio signal from another Pocket Wizard.

Pocket Wizard "Multi-Max" in the Receiving camera's hot shoe.
A special cable is required. This one is a Canon '3-pin plug to mini-microphone', with an inline pre-release switch. You can turn the pre-release on to keep the camera "awake" so it fires instantaneously, or leave it off to allow the camera to "sleep".


The other Pocket Wizard can be mounted in another camera hot shoe, and will trigger as the other camera fires, or it can be triggered by hand.
This photo is in our back yard, with the cameras about 3 feet away from each other, but the range for Pocket Wizards is supposed to be 1600 feet. Not too sure I would count on that distance, but they are definitely reliable from the other side of the race track. 
I tend to hold the triggering PW in my left hand, because I don't always want the remote to fire every time I hit my hand held. Plus, I'm usually firing cameras that have different frame-per-second firing rates.


 Here's what the set up looked like last Saturday at the track...
The first photo was taken with the 2-camera set-up. Both are set at 200mm, one is an "innie" and one is an "outie", so I should get a nice tight frame wherever the horses run on the track. Got it with the "outie" this time since the horse ran wide. Did I mention that I missed it with my hand held?

 
 The second photo was taken with the "wide angle" remote. As always, I frame the background (in this case the grandstand), and preset a focal plane for the horses to run through. Notice in the photo info that I set this camera to fire 1 stop faster, 1/3200. The horses are running across the focal plane in the wide angle shot, rather than straight into the camera with the 200mm zoom, so the wide needs to be fast.


The third shot was taken with the fisheye. I used a Magic Arm clamped near the finish line. 
Tip: Do Not clamp to the mirror or any timing devices at the track...lol. 


This Magic Arm and Super Clamp will go about anywhere you can imagine. Like on the starting gate, or the photographer's stand. Or above the trellis at a wedding...


Or under a Steeplechase jump...

Steeplechase at Ky. Horse Park. Photo: Matt Wooley, Shutter Priority, 1/2000 @ iso500, f/4.5, +1/3ev, 16mm.

One of the keys for remotes is setting a focal plane. I pre-focus on a point at which I think the action will occur. Switch the lens off to Manual Focus, so it does not try to Auto-focus during the shot. Then fire on Burst Mode as the action occurs. In horse racing, if I'm preset on the finish line, I'll fire a burst of about 30 frames (at 10 frames per second) as they cross the wire. My goal is to get 2 or 3 frames that are sharp, enabling me to pick good foot position.

Okay, those are some of the basics. There is a LOT to learn about remotes, and a lot that can go wrong. But coming away with a really unique shot is definitely worth the effort. If you want your stuff to look different from everyone else on the sidelines with a camera, give it a try!
To get started you will need, at minimum, 2 Pocket Wizard Plus II and a Release Cable (for Canon). Total investment about $450. An upgrade to the PW's that I like, is the Pocket Wizard Multi-Max.
At big events we "hard wire" the remote cameras using lamp cable, since there is so much radio interference from cell phones and TV transmission, but the Pocket Wizards are good for 90% of the time. 

We love to hear your comments! Or if you have a question, and I will try to answer it.


Photo: Alex Evers.
Capture the Light Equine is pleased to announce our Fall Bluegrass Equine Photography Workshop!
We had such positive response from our Spring Workshop, we are doing it again November 1-3. Conveniently planned for the week before the Breeder's Cup, this class will be limited to 9 participants with 3 EquiSport instructors. We will visit some pretty cool spots in the Bluegrass for equine photography, like Old Friends, Keeneland, Kenny McPeek's training center, and Spendthrift Farm. Check out the details and drop us a line!

Sunday, June 5, 2011

Macho Uno... Portrait Session

EquiSport Photos has been on location this past week for one of our favorite clients, Adena Springs in Central Kentucky. Some pretty high profile stallions live there, like Kentucky Derby winner Giacomo, top producer Awesome Again, Ghostzapper and Einstein.. one of the smartest horses out there. They also happen to be some of the best cared for horses on the planet!

Bill Drury (left in photo below with khaki cap) is the stallion manager, he always looks forward to our visits...lol. Parading the boys out to the paddock is just what he needs on a 90 degree June afternoon after a busy day in the breeding shed. But he always seems to have a smile on his face, and a cheap cigar between his teeth.

Wendy and I needed to produce a variety of photography for an upcoming ad campaign, from portrait and paddock, to scenic farm shots.
This is the scene for one of the portrait shots of Macho Uno, He is the sire of Mucho Macho Man... one of the Belmont Stakes favs.

Mucho Macho Man stands for a portrait at Adena Springs Farm. Photo: Wendy Wooley
6 of us are involved with the shot. 2 grooms handle the horse. Bill and an assistant get the horses attention. Wendy got this shot, and she handles the reflector duties. All I have to do is work the camera!

Macho Uno. Photo: Matt Wooley 1/1000 @ f/5, ISO 200, -1 EV, 150mm
 I'm working in Aperture Priority for this type of shot. To get this shot I set it on f/5 to get the right depth of field, and just adjust the Exposure Compensation dial until the background goes dark. We have talked about "riding the exposure dial" in a previous post. I want to get just a few Highlight Alerts on the white horse. If I had left the EV at 0, I would have a mucho blown out horse against the dark background. Notice my low perspective, I don't want the hip too high.
The photo that was submitted to the client was not cropped this closely. One of my hardest  lessons is learning to leave the final crop to the graphic designer. They will often need room for text in a full bleed ad or may want to add a gradient layer to resize the image.

Macho Uno. Photo: Matt Wooley 1/1600 @ f/5, ISO 200, 0 EV, 150mm


This is the shot the client selected. Again I have cropped it in a bit, more blue sky will be added as a gradient to the top, to make this a full page vertical spread. F/5 is a good aperture here as well, it keeps the focus on the horse. I'm shooting with a 70-200 at 150mm to compress the image, making the distant barn more prominent. 

Then it's out to the paddock. Wendy uses the 500mm and I have the 300. We are strategically placed for the best light. The groom walks the horse across the paddock and turns him loose. The stallions always have a bit of run in them after being in the stall.

Mucho Uno. Photo: Matt Wooley 1/2500 @ f/5. ISO 400, 0 EV, 300mm
I stay in Aperture for the paddock shots too. F/5 works well for keeping the entire horse sharp, and blurring out the distracting background. I raised the ISO to keep a good fast shutter speed.

It pays to keep an eye out to the adjacent paddocks when working on the farm. Wendy got this great shot of Giacomo doing his best "Bobby Badass" imitation.

Giacomo. Photo: Wendy Wooley 1/5000 @ f/4.5, ISO 640, 0 EV, 500mm

Capture the Light Equine is pleased to announce our Fall Bluegrass Equine Photography Workshop!
We had such positive response from our Spring 2011 Workshop, we are doing it again! Conveniently planned for the week before the Breeder's Cup, this class will be limited to 9 participants with 3 EquiSport instructors. Check out the details and drop us a line!